Raspberry Pi email/SMS doorbell notifier + picture of the person ringing it
I have been receiving requests to build a SMS doorbell from all around the world ever since my SMS doorbel project got featured on hackaday, damnGeeky, hackedgadgets and few other places . My approach is relatively difficult to follow, so I decided to put up some simple steps for you folks to follow and get even better results than my original project. You will need the following components
- A Raspberry Pi, any model will work. I have mine equipped with a WiFi dongle so that I don’t have to worry about Internet cabling
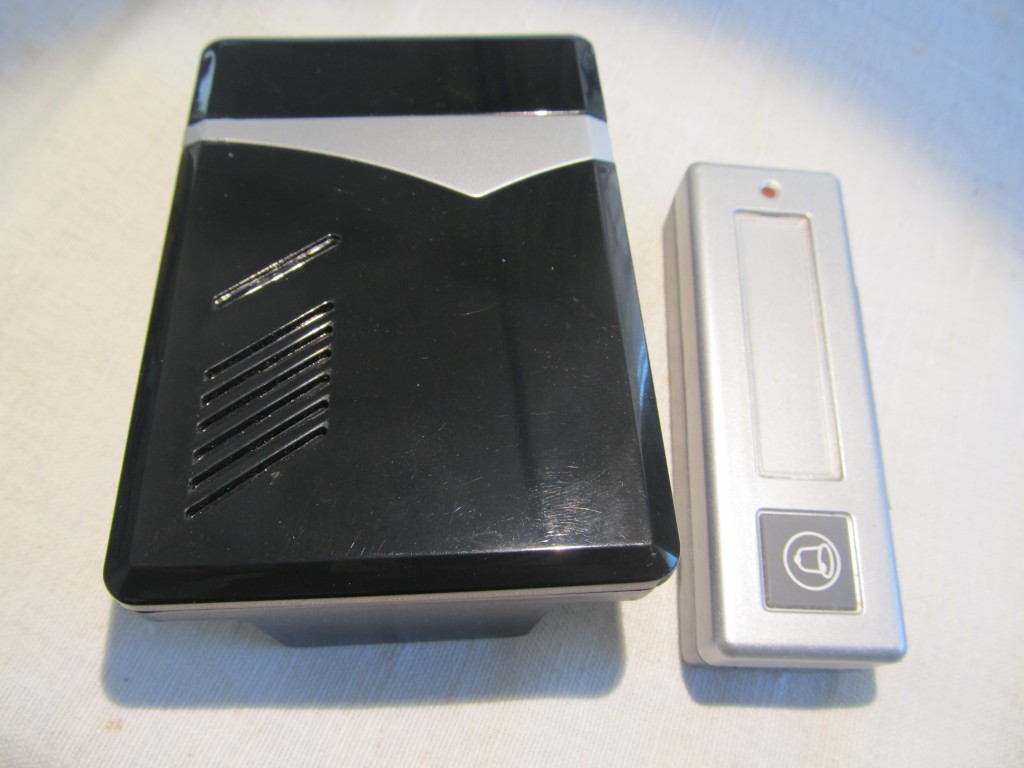
- A wireless doorbell. Any make, any band, just make sure that
- A USB web camera (optional, if you wish to take a picture of who is ringing your doorbell). Make sure yours is compatible with Raspberry Pi: http://elinux.org/RPi_VerifiedPeripherals
- A 220ohm resistor (optional, added for peace-of-mind)
- Soldering iron
- A GMail account
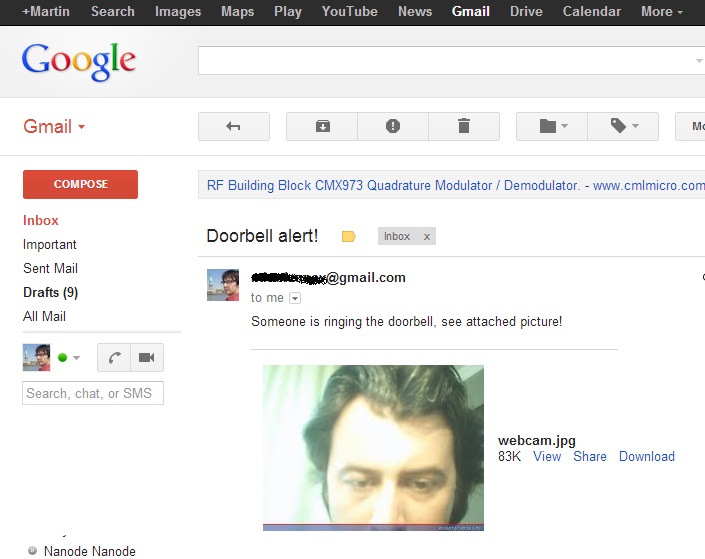
The idea is the following: to tap into the doorbell base’s LED and have a script look for the LED blinking; If it finds it blinking, then someone is ringing the doorbell. We take a picture and email it as attachment. You can then set up a rule in GMail to forward to a email-to-sms service, if you wish, or simply to other email accounts that are connected to your phone, so that you would receive immediate notification.
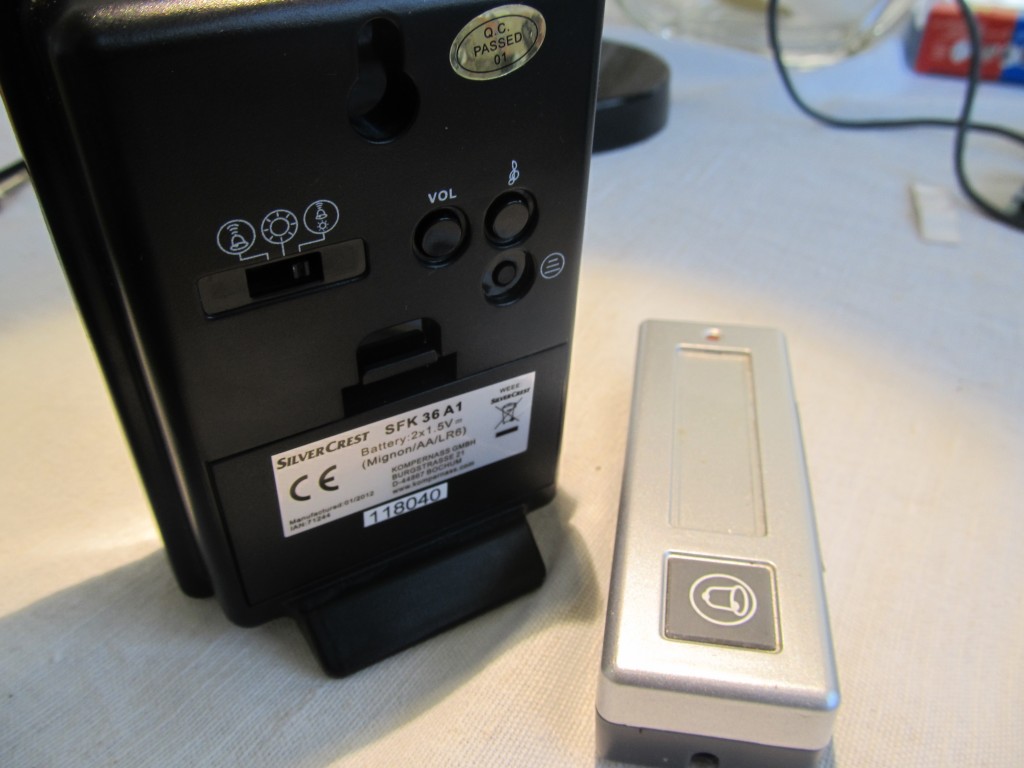
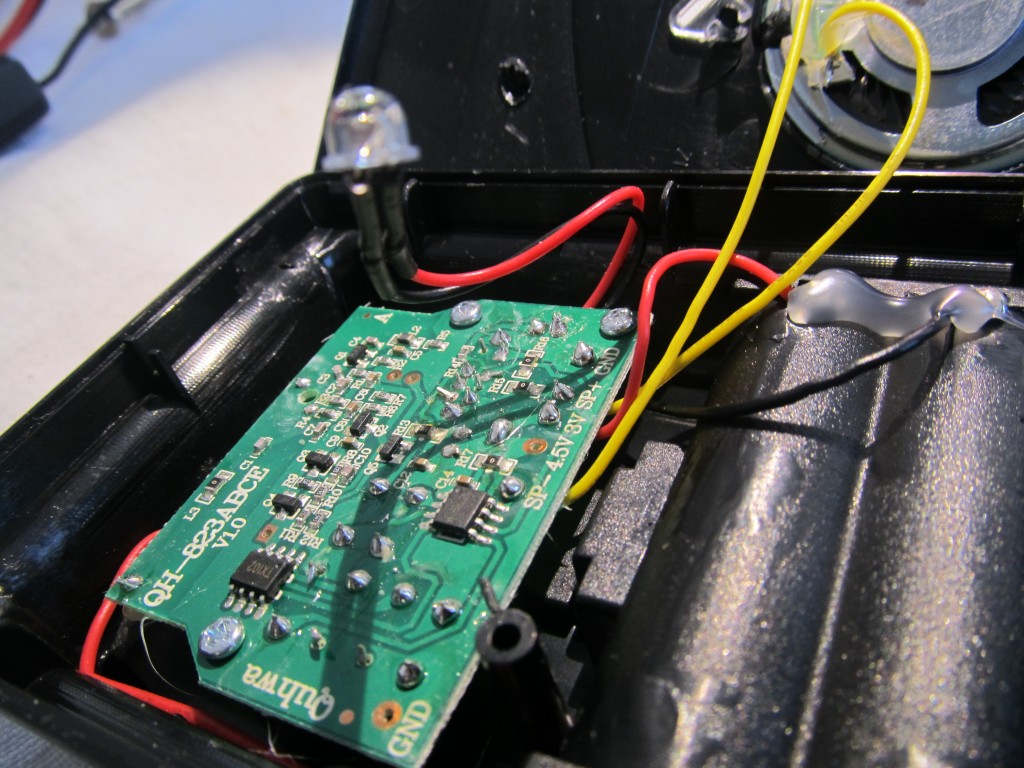
So lets get hacking. I took my wireless doorbell apart, that was a bit tricky because there were no screws. Mine just snaps together and I had to use a flat screwdriver to snap it open.


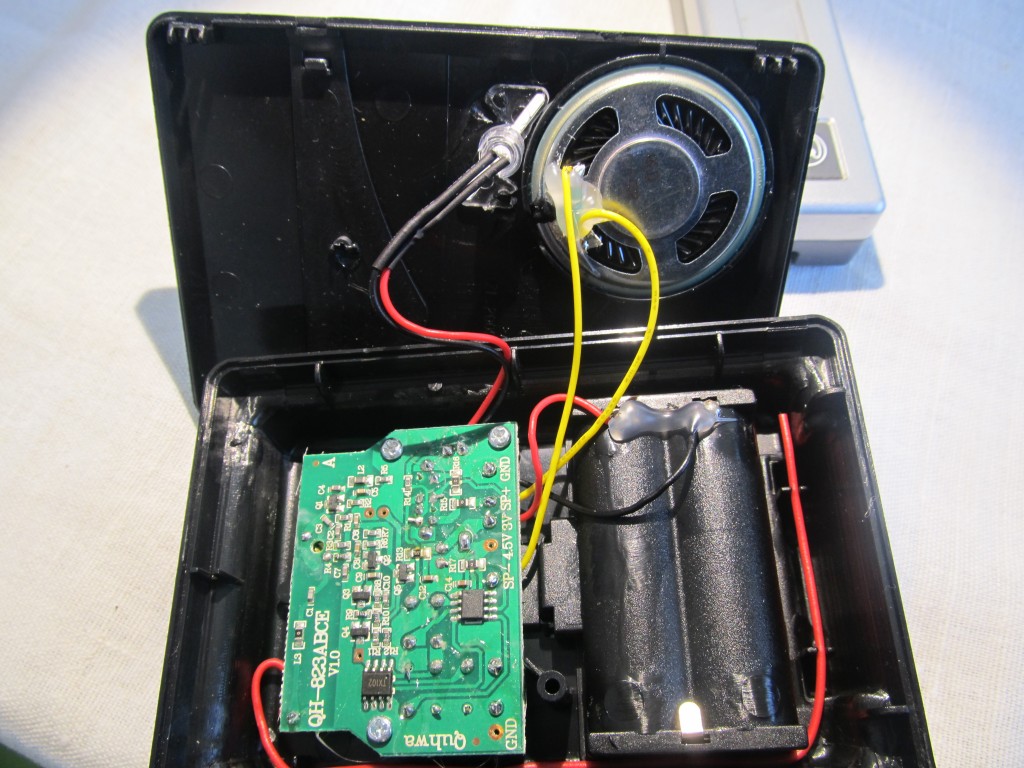
Once opened, look for the leads to the status LED. We need to grab the signal from there and route it to the Raspberry Pi. One lead is the positive and the other negative (anode/cathode of the LED). It is important to get these right, use a multimeter, if in doubt. In my case, the wires to the LED were colored, so I had no doubt which is the positive and which is the negative:
I was curious what kind of signal we get on the LED, so I hooked it to my oscilloscope:
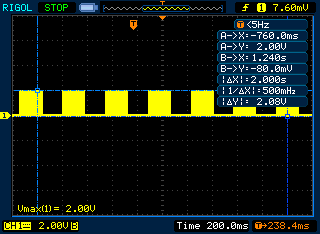
It pulses (actually the pulses depend on the chime chosen) at 2V with some PWM. I thought the PWM may cause troubles, and was prepared to make a low pass filter to remove it, but then it turned out not to be a problem. The reason we needed a 3V base is so that this captured signal doesn’t exceed Raspberry Pi’s 3.3V limit on GPIO pins. A 2V signal registeres as a ‘HIGH’, so we are perfectly good. You don’t need to repeat this step, this is just for my own verification.
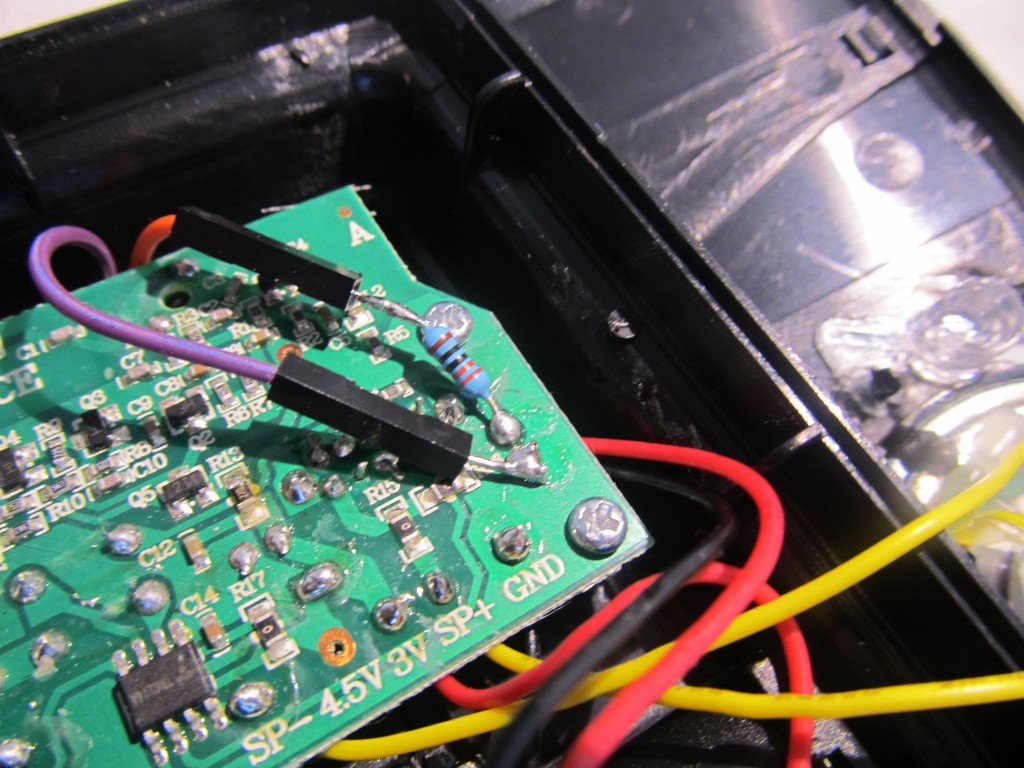
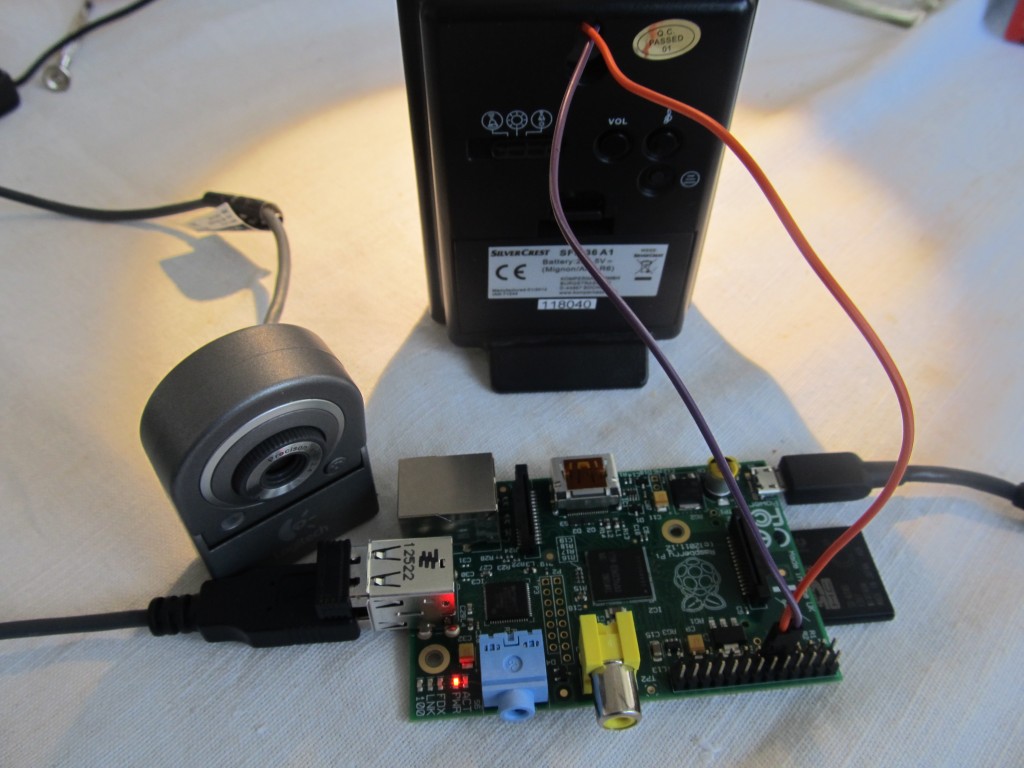
Next, I soldered two wires, one to the anode and the other to GND. Common GND is required for this to work. The current to the anode is already current-limited, but for peace-of-mind I added a 220 Ohm resistor in series:
I am done with the hacking part, I now closed the base with the wires leading out of it:
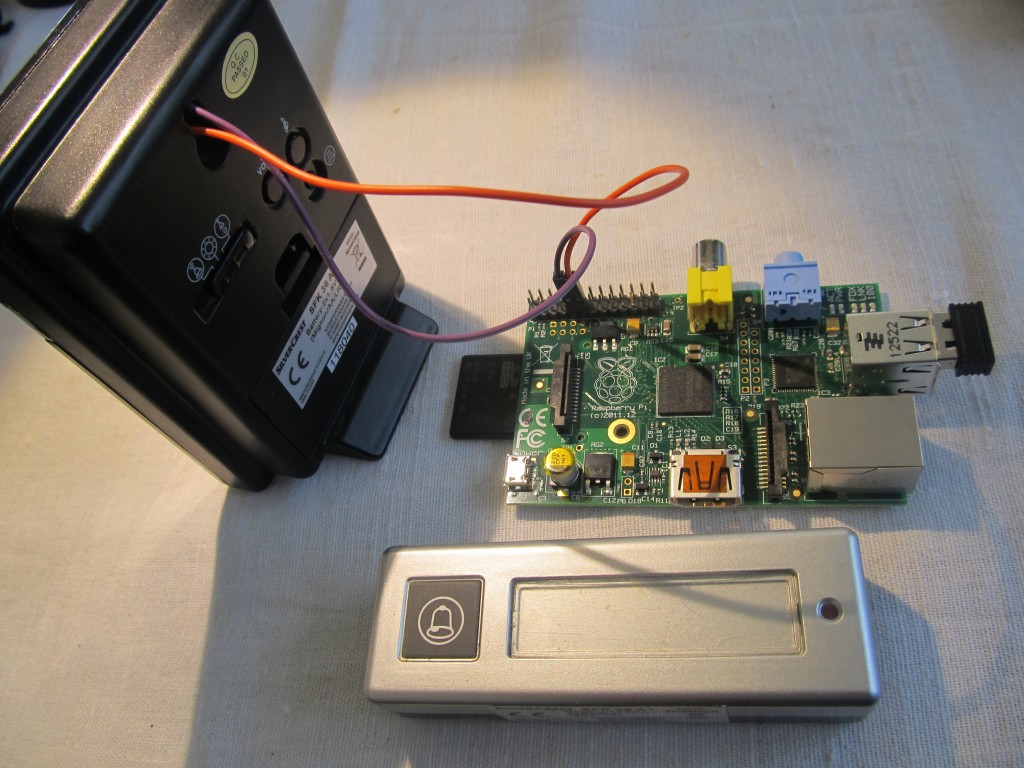
The GND wire connects to some GND pin of the Raspberry Pi and the anode wire connects to GPIO 17. See the GPIO header map, GND and Pin 17 are next to each other: http://elinux.org/RPi_Low-level_peripherals
Now to move on the software part. You will need fswebcam to take the webcam snapshots, this is optional
sudo apt-get install fswebcam
Next, create a python script that will watch the state of GPIO pin 17 and take some action when the doorbell brings it to ‘HIGH’. Script for this was taken from here.
nano wait_doorbell.py
and it should look like this:
import RPi.GPIO as GPIO
import time
import os

#adjust for where your switch is connected
buttonPin = 17
GPIO.setmode(GPIO.BCM)
GPIO.setup(buttonPin,GPIO.IN)

while True:
    #assuming the script to call is long enough we can ignore bouncing
    if (GPIO.input(buttonPin)):
        #this is the script that will be called (as root)
        os.system("fswebcam -r 960x720 -d /dev/video0 /home/pi/webcam.jpg")
        os.system("python /home/pi/sendnotify.py")
To have this run upon booting, we need to edit /etc/rc.local (as root since this is the owner).
sudo nano /etc/rc.local
At the bottom, just above
exit 0 we’ll add a call to our script.python /home/pi/wait_doorbell.py
Next, lets create the mailing script, what I used is the “Sending Attachments through Gmail from the Raspberry Pi” script:
nano sendnotify.py
..with the following content, replace the username and password as needed:
#!/usr/bin/env python
import smtplib
from email.MIMEMultipart import MIMEMultipart
from email.MIMEBase import MIMEBase
from email.MIMEText import MIMEText
from email.Utils import COMMASPACE, formatdate
from email import Encoders
import os

USERNAME = "username@gmail.com"
PASSWORD = "password"

def sendMail(to, subject, text, files=[]):
    assert type(to)==list
    assert type(files)==list

    msg = MIMEMultipart()
    msg['From'] = USERNAME
    msg['To'] = COMMASPACE.join(to)
    msg['Date'] = formatdate(localtime=True)
    msg['Subject'] = subject

    msg.attach( MIMEText(text) )

    for file in files:
        part = MIMEBase('application', "octet-stream")
        part.set_payload( open(file,"rb").read() )
        Encoders.encode_base64(part)
        part.add_header('Content-Disposition', 'attachment; filename="%s"'
                       % os.path.basename(file))
        msg.attach(part)

 server = smtplib.SMTP('smtp.gmail.com:587')
 server.ehlo_or_helo_if_needed()
 server.starttls()
 server.ehlo_or_helo_if_needed()
 server.login(USERNAME,PASSWORD)
 server.sendmail(USERNAME, to, msg.as_string())
 server.quit()

sendMail( ["*******your_email********@gmail.com"],
        "Doorbell notification",
        "Someone is ringing the doorbell, picture attached",
        ["/home/pi/webcam.jpg"] )
So now you can reboot to have the background watching script run and test it by pressing the doorbell knob. If all is setup, you will get an email like this in few seconds: